Like many women, I have a plethora of jewelry odds and ends tucked her and there. Mine was getting to the point that I had crammed 2 jewelry boxes, a wall hung necklace holder, half of a free standing jewelry stand and a couple of random other areas full of pieces of jewelry. I was always fighting to untangle necklaces, dig for bracelets and wondering which little drawer such-n-such might be in. It was taking up room and frustrating. Then I thought, "I need a giant wall hung cabinet that can hold ALL my jewelry which I can see just from a glance. Simple right? Not so much. I looked at many stores and online. Most large jewelry cabinets/chests were $200+ and still were mostly drawers. I did find a couple online which were overall the idea I was going for. This one was nearly $150, but not enough hooks or storage overall.
http://www.amazon.com/Jewelry-Armoire-Mirror-Cabinet-Black/dp/B0033J8YIK/ref=sr_1_1?ie=UTF8&qid=1337210075&sr=8-1
Then I thought this one was cool, but again, not enough space, and not a cabinet, better price at about $60 though.
http://www.amazon.com/Overdoor-Jewelry-Organizer-Bronze-Longstem/dp/B004DYUAXG/ref=pd_sbs_hg_3
I gave up and decided to make my own!
I wanted it to have the following:
*Character
*Color
*MANY hooks
*An earring holder
*A ring holder
*Possibly a couple drawers (did end up with them, after all)
I wanted to use the following:
*A combo of hooks and old drawer pull/ cabinet hardware and "cup" hooks
*Cheap items
*Reclaimed items/re purposed items
* A budget of about $25
The breakdown with costs
Originally, this was going to be made from pre-made laminate shelves that you can get at any DIY place. I had two short ones and got a couple longer ones from my mom. This didn't work, because I would have had to cut them and was worried the laminate would rip. Scratch that idea.
Now, before I go into too much detail, I must say that this project WOULD cost quite a bit more, but I went "shopping" in my parent's garage/house for items to use (they are more than happy to have me take away some "junk"). I also used a few coupons for $5 off your next order coupons for a few of the items I used.
Items I found from "shopping" at my parents:
*Picture frame (used for earring holder)
*Cabinet door (used to be in my room back when I lived there, has been sitting in garage for over 15 years now!)
*Piece of faux wood wall board (used for back on cabinet)
*A couple bags of random cabinet/drawer pulls. I found a bunch of one type, a few of another to use)
*4 "L" braces (these are used to hold the cabinet together.
*Long square pieces of wood (I cut these down and used them to attach the "hooks" to)
*Random piece of 1x4 wood (used this as the "top" of my drawers)
Things I had:
*Drawers from an existing jewelry box that I used
*Spinning "hook" thing from existing jewelry box.
*Disposable grill topper (this was used for part of the earring holder)
*Rubber gloves (stain application)
*Small picture frame (used on ring holder)
*Teal paint
*Paint brushes, rollers, roller covers, paint roller tray
*Screws
*Fleece (used for ring holder)
*Hot glue/glue gun
*Mini Padlock
Things I bought and costs (approx.):
*Wood. I went to Home Depot and selected a 16' section of wood. I believe it was 1 1/2x6". This may not be exact, but I think that was the size. My door is an odd 19"x43", so I had them cut it into the sizes I need (this was free). The piece of wood was just under $6.
*White latex house paint. I got outdoor paint. It didn't much matter, really. I got a quart at Dollar Daze for $1.50.
* Dark Walnut Minwax stain. Original price was about $7, I used a $5 off coupon, so I paid about $2.
*Poly Acrylic semi gloss Minwax clear coat. Original price was about $5, again I had a $5 off coupon, so this was free.
*2 (more) sets of "L" brackets, they were about $1.50 each, and 1 sanding block, which was about $4.I used another $5 coupon for these as well so this cost about $2.
*White calk, this is to attach the earring and ring holders. On clearance for $1.79.
*Pack of white "cup" hooks, $5 but used my (last) $5 off coupon, so free.
*2 packs of foam hair rollers and small wood box, $1 each at Dollar Tree. (Used for ring holder) $3 total.
*2 small cork bulletin boards, $1.09 each. (Used for earring holder) $2.19 total.
*Pack of small clear shelf brackets. (Used for small shelf above drawers) $1
*Small hasp for door. $2.50
*Eiffel Tower decal for front (still not sure if I like it on there) I bought with a 40% coupon at JoAnn Fabrics, ended up costing I believe $5.
Total Out of Pocket Cost: Approx $26, Add Decal, $30.
Not too bad and not too much over budget.
NEXT: DIY Earring Holder!
Sunday, May 20, 2012
DIY Earring Holder (Part 2 of DIY Jewelry cabinet)
Part of my large Jewelry cabinet was a DIY earring holder. This could be done to hang alone as well. I got ideas from Pinterest. If you haven't yet checked this site out, do so!!
Anyhow, it came down to two things I wanted for my earring holder- something open to hang earring with ear wire hooks and something that I could "stick" my post style earrings in to.
I had a large frame from my mom's which was the basis of the frame. I added a mesh-like grill grate to one side and cork board (backed with cardboard) to the other. In the end, I glued a piece of scrapbook paper to thin cardboard and glued that to the back side.
I think I may have abused some sort of hot glue-usage rule?!?
Apparently I forgot to take photos of this step by step, but I can tell how I did it.
Here is the step by step:
1) I painted the frame, 3 coats of white paint and two coats of teal accents.
2) I removed the piece of plastic that surrounds the two small bulletin boards, turned them over and made sure they were side by side (edges) flush with one another
3) Used a wide strip of thin cardboard and glued it to the back of the bulletin boards to form one large piece.
4)I cut into the ridges in the side of the bulletin board's cardboard backing and pushed the edge of the grill topper grate into the cut, using hot glue to attach.
5) I turned the frame over and hot glued the earring holder to the frame.
6) Using Mod Podge, I glued a piece of scrapbook paper to a thing piece of cardboard, wait until it is dry then glued it to the back side of the area where the grill topper grate was.
7) Using the plastic strip that surrounds the bulletin board, I cut it to fit over the sections of my earring holder where I joined the pieces. Hot glued the pieces down.
DONE!


NEXT- DIY Ring Holder!
DIY Ring Holder (part 3 of DIY Jewelry cabinet)
As with the earring holder, I have found many DIY ideas for ring holders on Pinterest. This was pretty simple and cost me about $3 to make. The frame I used was a previous purchase from the same store where I got all the other supplies that I used, so this could be made for $5 or so if you had to buy all the supplies. I had purchased the stain and clear coat for my cabinet, so that cost isn't included here either. I also used paint that I had.
Here is how I made it:
Supplies: Picture frame, 2 packs of foam Hair rollers, a small wood box, white fleece, stain, clear coat, paint and LOTS of hot glue!


1)Stain the wood box, let dry and then put a layer of clear coat on top for protection and shine.
 2) Remove plastic rod pieces from foam rollers. I think I used all but one or two total from the two packs.

3) Determine how many rollers you will need to use by placing them inside the box, you want them snug, but not too snug that they are popping out. Cut pieces if you need. I used approx. 2 1/2 rollers glued end to end for each row.
4) Glue roller ends together, squishing the pieces together after glued to help glue hold.


5) Cut pieces of fleece the same length as the rollers and large enough to go around the rollers with about 1/4" excess overage overlapping. Cut enough for all of the roller pieces.
6)Run a line of hot glue along the edge lengthwise on the fleece, carefully glue roller piece down.


Here is how I made it:
Supplies: Picture frame, 2 packs of foam Hair rollers, a small wood box, white fleece, stain, clear coat, paint and LOTS of hot glue!


1)Stain the wood box, let dry and then put a layer of clear coat on top for protection and shine.


3) Determine how many rollers you will need to use by placing them inside the box, you want them snug, but not too snug that they are popping out. Cut pieces if you need. I used approx. 2 1/2 rollers glued end to end for each row.
4) Glue roller ends together, squishing the pieces together after glued to help glue hold.


5) Cut pieces of fleece the same length as the rollers and large enough to go around the rollers with about 1/4" excess overage overlapping. Cut enough for all of the roller pieces.
6)Run a line of hot glue along the edge lengthwise on the fleece, carefully glue roller piece down.

7) Roll the fleece around the roller and add another line of glue to edge, securing to the roller. The roller should be covered with fleece now (except for ends).

8) Run a line of glue over the section of roller that has the fleece edge (underside) and press into top of wood box, making sure it is snug against top edge of box. Repeat with remaining roller pieces, making sure to space pieces evenly.

At this point, your ring holder could be done, but to add a little bit of a more "finished" look, I painted a basic wood frame and hot glued it to the top. This also helps hide any of the foam ends of the rollers that may be poking through.


NEXT- DIY Jewelry cabinet
DIY Jewelry Cabinet Part 4
This is the last part of my DIY Jewelry cabinet posts. If you haven't yet, read the first 3 to see how I got this far and what is what, as it is explained in those posts, and I would rather not repeat! Now, here is my step by step (or pretty close) on how I constructed this beast!

1) I started by sanding down the rough ends of the wood I purchased as well as the long pieces that I will use for the cross pieces. I drilled holes in the cross pieces (this is where the cabinet/drawer pulls will go).
2) Because the pieces were cut to my measurements, I didn't have to do much measuring here. I used the "L" brackets to hold all 4 pieces together to build a sort of frame. I used 2 per corner on the inside of the frame.


 After I had the door on and fitting to the frame, I took the door off.
4) Measuring where I wanted the inside cross pieces to go, I marked them on my frame and screwed in screws from the outside to the inside. The screws went through the ends of the cross pieces to hold them in place.


5) I painted 4 drawers from an existing jewelry box to use and used them as a visual template as to how I would implement them into my current project. The result was a kind of cobbled together piece that is better viewed than explained. Basically, I used a piece of wood which I cut to the length of the inside of my cabinet and the drawers were to go under it. For spacers between the drawers, I caulked pieces of left over wood that I used as cross pieces. Confused yet? Look at the photo! I then drilled deep enough holes to fit plastic shelf brackets into the frame for the shelf to sit on.


 6) At a few points between other parts of the project, I cleaned and painted all of my cabinet/drawer knobs and the door hardware.

7) The cabinet is more or less ready to put together now! Now comes the staining, painting and clear coating.
10) After all was dry, I caulked the earring and ring holders to the back side of the cabinet door. I painted an extra piece of the cross piece wood teal and added and bunch of cup hooks to it and caulked that to the inside of the door as well. I also painted a little mirror I had to match the color scheme and added that to the inside of the door. I let the door set flat for a couple days to let the calk cure so it wouldn't slide around.
 11) Once the door pieces had time to dry/cure, I put the hardware back on the cabinet along with a hasp to lock it if I want and added the Eiffel Tower decal... still unsure about that, but it looked too plain. I may get a thin mirror to replace it, we shall see. I then added the door to the cabinet.

12) I screwed in all of the drawer/cabinet knobs as well as many cup hooks. I also added a spinning hook thing which was re purposed from the same jewelry cabinet I took the drawers from.

 13) I screwed the door back on to the cabinet, testing the fit and making a couple adjustments.
14) I screwed in two "L" brackets with the top edge and one hole sticking out from the top of the cabinet to be used as the hangers for the cabinet.
15) I had to wait for the back piece and it was still in my mom's garage, so it was a couple day wait time and I wanted to get it done! But, once I got it cut and painted (3 coats of white paint) I was able to nail it to the back side of the cabinet.


 DONE! Finally!! It was a pain in the butt to get it onto the wall because for some reason one side the hook kept tearing the wall, so I had to move it to another wall, not where I wanted it, but it works. I got it all filled and wouldn't you know, it's FULL! Now to go back through and do a little spring cleaning of my jewelry to make more room.

1) I started by sanding down the rough ends of the wood I purchased as well as the long pieces that I will use for the cross pieces. I drilled holes in the cross pieces (this is where the cabinet/drawer pulls will go).
2) Because the pieces were cut to my measurements, I didn't have to do much measuring here. I used the "L" brackets to hold all 4 pieces together to build a sort of frame. I used 2 per corner on the inside of the frame.


3) After the frame was built, I attached the door to make sure it fit properly, apparently the wood was ever so slightly bowed in a couple spots, so I just moved the "L" brackets a bit and screwed them back down.

4) Measuring where I wanted the inside cross pieces to go, I marked them on my frame and screwed in screws from the outside to the inside. The screws went through the ends of the cross pieces to hold them in place.


5) I painted 4 drawers from an existing jewelry box to use and used them as a visual template as to how I would implement them into my current project. The result was a kind of cobbled together piece that is better viewed than explained. Basically, I used a piece of wood which I cut to the length of the inside of my cabinet and the drawers were to go under it. For spacers between the drawers, I caulked pieces of left over wood that I used as cross pieces. Confused yet? Look at the photo! I then drilled deep enough holes to fit plastic shelf brackets into the frame for the shelf to sit on.


7) The cabinet is more or less ready to put together now! Now comes the staining, painting and clear coating.


8) With cut open trash bags laying on my kitchen floor as a makeshift tarp of sorts, I applied 2 coats of stain to the cabinet frame, cross pieces and shelf. After the stain had a night to dry, I clear coated it for protection and shine.
9) The cabinet door received 3-4 coats of the white latex paint over the course of a couple days.10) After all was dry, I caulked the earring and ring holders to the back side of the cabinet door. I painted an extra piece of the cross piece wood teal and added and bunch of cup hooks to it and caulked that to the inside of the door as well. I also painted a little mirror I had to match the color scheme and added that to the inside of the door. I let the door set flat for a couple days to let the calk cure so it wouldn't slide around.


12) I screwed in all of the drawer/cabinet knobs as well as many cup hooks. I also added a spinning hook thing which was re purposed from the same jewelry cabinet I took the drawers from.


14) I screwed in two "L" brackets with the top edge and one hole sticking out from the top of the cabinet to be used as the hangers for the cabinet.
15) I had to wait for the back piece and it was still in my mom's garage, so it was a couple day wait time and I wanted to get it done! But, once I got it cut and painted (3 coats of white paint) I was able to nail it to the back side of the cabinet.


Saturday, February 4, 2012
Home made laundry soap- powder
I am continuously looking for common household products that I can make on my own. I have been wanting to try making my own laundry soap for a while now. Since I seem to have the bar-to-liquid soap making down, I decided to try laundry soap. It seems like it's so expensive to buy it! I usually buy the CHEAP stuff which is almost always Purex on sale for about $3 for "32 loads" size. I however, over-do it. I use about one full cap for each load, as opposed to the recommended 1/3 to 1/2 cap. Granted, I use a commercial machine which holds more, but still, I think this might be a mental thing? Never mind that, I do like Purex though, and it is fairly inexpensive as well. But, can I make something just as effective for cheaper? Instead of starting out with a liquid, I decided to try a powder version, even though I don't really care for powder detergent as it seemed to be easier and cost me less work and time. There are many recipes online for laundry soap, but here's the version I went with.
**What you need**
+Super washing soda (I found Arm &Hammer brand)
+ Borax (20 mule team Borax)
+1 bar of Fels-Naptha soap.
+Grater and/or food processor
+Container to store your soap in.
**How to**
+Grate 1 bar of Fels-Naptha soap into a bowl
I grated the soap with the smaller hole side of the grater. You can also use a food processor. I have a small food processor for light-duty small jobs, I tried this after cutting the soap into small chunks with no luck. I did however put the grated soap into the processor to make it into smaller pieces. I don't think this is really necessary though.
+Add 1 cup of borax to bowl
+Add 1 cup of super washing soda to bowl
+ Mix using a spoon.
I tried mixing with my hands first, but had a small cut, which it irritated.
That's all, pretty easy! Store it in a container with a lid so it doesn't collect moisture. Also, its a good idea to tape shit or transfer your Borax into a sealed container as moisture in the air will cause it to harden.
**To Use**
This is what I did, I think you could probably just add your soap as you would normally. I don't use powder, so I wanted to let it disburse in the water a bit before adding the clothing.
Start washer with water, let fill about 3-4 inches deep.
Measure 1-2 tablespoons and sprinkle into wash water
Add clothing and close lid, let finish wash cycle.
Now, I searched and read all things about home made laundry soap making. There are many different recipes, but most of them contain something similar to what I have listed.
**Where to find the ingredients**
All the products I found in the laundry aisle at Meijer. I have read that a lot of people have trouble finding the Super Washing Soda. They sell it at Meijer and it can also be purchased online from what I understand.
All of the ingredients have been used for many many years. I know that both the Borax and Fels-Naptha have been around for 100+ years. If it's been around that long, I'd say it is a pretty trust worthy product.
The super washing soda and borax were in the section where you also find laundry additives such as wash boosters, stain removers, oxi clean, etc and conveniently right next to one another.
The Fels-Naptha was a little harder to find. It was actually with a small section of body and hand soaps in the same aisle, near the dish soap. I found it next to soaps such as Kirk's Castillo soap and those pumice soaps like Lava.
**What are these ingredients?**
These ingredients are nice for the environmentally conscious or those with skin irritant allergies. Both the Borax and Super washing soda are natural.
Borax is also called sodium tetraborate and is naturally found in dry lake beds. It has many household uses and in this recipe used as a laundry booster and odor remover. Read more here: http://en.wikipedia.org/wiki/Borax
Super washing soda is also called sodium bicarbonate or soda ash and is also a natural, mined element. This is used as a water softener and booster as well. Read more here: http://en.wikipedia.org/wiki/Washing_soda
Fels-Naptha is a laundry stain remover soap that has been around more than 100 years. It is also used to treat poison ivy/oak.
** Cost (approximation)**
Washing Soda 55 oz- $3
Borax 76oz-$3.25
Fels Naptha Bar- $1.10
Total $7.35
You won't be using all of either powders, so this is an overall start up cost.
Borax, approx 1/9th of the box- Cost: $0.33
Washing soda, approx 1/6th of the box- Cost: $0.54
Fels-Naptha bar, whole bar- Cost: $1.10
Total $1.97
**Yield per batch**
This will make approximately 3 1/2 cups.
Depending on size of load and how much you use will determine how many loads you will get from this.
"Recommended" amount is:
+ 1 Tablespoon per load
+ 2 Tablespoons for larger or heavily soiled regular loads
For me, I tend to over-do it, thinking the more you use, the better. So I used about 3-4 Tablespoons in a commercial washing machine that holds about 1 1/2 average loads of laundry.
Based on a 2 Tablespoon per batch measure, you would get about:
+28 loads per batch, 7 cents per load!
I am going to compare this to my personal usage of laundry soap, where 1 bottle of "32 load" size will yield me about 10 loads and the home made yields me about 14-19 loads.
I will then compare based on the listed load size.
**My personal usage comparison
If items are purchased at full price:
Tide liquid 32 load size- approx. $6/ $0.60 per load, $48 per year
Purex liquid- approx $4/ $0.33 per load, $32 per year
Home made powder- 3 1/2 cups approx $2/ $0.14 per load, $12 per year
+++Savings: at least $0.19- $0.36 per load, $20-$36 per year, up to 75%+++
On average, I do about 1 1/2 loads of laundry per week (which is equal to about 3 loads regular). At this rate, I do about 80 (or 160 regular loads) or so loads per year!
**Recommended usage comparison, based on small load
Tide liquid 32 load size- $6/ $0.19 per load/$30 per year
Purex liquid- $4/$0.13 per load/ $20 per year
Home made powder- $0.04 per load/ $6.40 per year
Based on a 3 load per week usage/160 loads per year approx:
+++Savings: $0.09- $0.15 per load/ $13.60-$23.60 per year, up to 79%+++
**How well does it work?**
There are many factors to consider, but I will share my experience to give an idea.
*I don't smoke or work in a place that make my clothing smell.
* I also don't perspire much or seem to stain my clothing very much, so I don't really need anything heavy duty.
*I also have fairly good city water which is NOT softened.
*I used a commercial grade washer, which holds a larger amount, about 1 1/2 regular load.
* I washed approx 3 pair of jeans, 6 shirts, 1 sweater, 2 pair of pajamas and about 4 days worth of socks, panties and bras
* I had one shirt with a fairly large smear of white deodorant on the arm pit, which had sat and caked-on. Other than that, no clothes had stains or pungent odors.
*I washed in warm water.
The Fels-Naptha has a heavy odor, you can smell it through the package. I don't mind the smell, but can see how some would be put off by it. This smell is about what your clothes will smell like coming out of the washer, but will dissipate after drying with a couple dryer sheets.
*This soap does not produce many suds at all, this doesn't mean it isn't cleaning. Most soap products contain sulfates which are foaming agents and are not needed to clean things, but help the cleaners in soaps.
*The shirt with the deodorant set-on came out clear with absolutely no trace of stain or deodorant smell.
*Clothes all seemed to be cleaned and have no odd Fels-Naptha smell.
**Overall, I like this soap and will make more. I plan to try liquid version next time. This may be a permanent replacement for store bought laundry detergent!
Sunday, January 15, 2012
Food buying, storage and handling- part four
Part Four- food "scraps"
We have all been there- you have just a small amount of pasta, cereal, meat pieces, etc. However, none is enough for a meal. Or maybe you have made too much rice and don't want to eat stir fry again. Produce is also something to go bad quick, creating a lot of waste. So what do you do with those little bits? How do you use up that wilted spinach or mushy banana? Here are some ideas and tips to get the most out of your food "scraps".
*Make soup!
Soup can be a great way to use up all your food scraps. You can put almost anything into soup and it is a good way to use up small amounts of things. Here are some soup ideas:
+ Chop up the miserable looking carrots, the wilty spinach and throw in the rest of that can of corn from last night's dinner.
+Use left over meat such as chicken or sausage from a prior meal. Or, if you have maybe a small chicken breast in your freezer with some slight freezer burn, putting it into a soup with many other items will lessen the freezer burn taste.
+Only have a half cup of rice or noodles, not enough for a big meal, but enough not to waste, you can put that into your soup too.
+Don't hesitate to make use of left over mashed potatoes, adding them to soup will help thicken your soup.
*Make your own broths
No need to spend $1 or more on a small little can of broth when you can easily make your own without buying anything extra.
+Don't throw out the chicken or turkey "bones". You could also use meat pieces for this. I like to add some onion to mine usually as well. Add it to a pot with just enough water to cover. Simmer until liquid has reduced by 1/4-1/3. Remove the bones and discard. Let broth cool. You may want to refrigerate as some of the fat will come to the top, which you can skim off. Put into freezer safe containers and label.
+Veggie broth can be made a few different ways and with different vegetables. This is a good way to use up vegetables that are getting mushy or wilted. Or if you have left over fresh vegetables from making a soup or garnish tray and don't have plans to use them, this is a good way to make use of them. I personally find that carrots, celery, onion and a few herbs are easy and flavorful. You could also use cabbage or other greens, peppers, etc. Add about 3 cups worth of mixed, diced vegetables to a large soup pot with water (about 6-8 cups) simmer until reduced by 1/4 to 1/3. Using a colander with a bowl under to catch the broth, pour broth into colander. You could also use a skimmer to scoop out the vegetables. If you want a bit of a twist, you could let the pot cool slightly and put it into a blender and blend with the vegetables for a thicker broth. Freeze in labeled containers.
*Left over pastas and rice
Aside from soup, rice and pastas can be used in many different dishes in small amounts. Here are some ideas:
~Dry rice and pasta
+Designate a container to hold all of your "end of box" pastas. As we use different pastas for different things, there is often a small amount left. Add that small amount to the container. Break up spaghetti, fettuchini, etc. After a while, you'll have enough to make a whole meal. Remember, most pasta is good for a few years.
+ Another option for small amounts of pasta is to add it to a salad or use it as a side for lunch or dinner for a single person. Cook pasta, cool under running cold water and add to a leafy salad for a little something extra. Or, cook and add a little butter and some seasoning or cheese for a side dish.
+ Rice can go a long way, so a little bit left could actually be enough for a meal. Other than brown rice, most rice will keep forever.
+ Consider adding small amounts of rice to soups or meatloaf.
~Cooked rice and pasta
+Left over plain pasta can easily be turned into a quick pasta salad. Add your favorite dressing, some cheese, veggies etc.
+Rice is very versatile and can be used in sides, main dishes, soups, etc. It can also be used for a sweet treat. Search recipes for rice pudding or eat in place of oatmeal, adding raisins, brown sugar and milk, etc.
*Cereal
You get to the end of your cereal box and have less than you would need make a bowl or there is a little bit that is on the verge of going stale and you don't want cereal. Here are some ideas of what to do with it.
+ Eat it dry as a snack, maybe pack it in with lunch.
+ Make your own snack mix: Add in other cereals, crackers, nuts, seeds, etc.
+ Make cereal bars, like rice crispy treats. If you have enough or if you have a couple different cereals that would work well for these, you could combine them with marshmallow and butter to make your own cereal bars
+ Some cereals work well in cookies and muffins. Try allrecipes.com for ideas.
*Crackers and chips
+ Crush into crumbs and use as a breading for chicken or fish, etc. I have found tortilla chip crumbs make an excellent breading for chicken. You could really use probably any type though.
+ Crush flavored chips and crackers into more of a "powder" and add to your favorite dip sour cream to add a kick of flavor.
+ Add to pasta salads for a bit of flavor
*Vegetables
This category is pretty vague as there are many different vegetables that are good for different things. Mainly remember most vegetables, while not best flavor and texture quality will be good even if wilted or starting to brown. Watch for mold and brown spots or mush. Cut the bad spots out. Use your personal preference as to what vegetables you would like to use.
+As stated above, great to add to soups or to make broth
+ Add to stir fry
+Dice into small pieces and add to spaghetti sauce or other casseroles
+Squashes are great for making breads and cakes. Aside from zucchini bread, try using butternut squash in place of pumpkin. Get creative.
*Fruits
Like vegetables, fruits can go bad quickly as well. They are also still edible even with rough spots. Watch for brown spots, mold, mushy spots and cut them out.
+Use fruits such as apples, peaches and pears as a topper for hot oatmeal.
+Cook fruits until soft, mash and cool. Eat like you would apple sauce. You could also add it for flavor to oatmeal, yogurt, cottage cheese, etc.
+Use in breads such as banana bread, apple bread etc. You could get creative with other fruits as well. Search for recipes that use the fruit you have.
*Sauces and Condiments
There is a condiment for everything, so naturally we all seem to have 20 open bottles of this and that. Sometimes it is hard to used up all of something.
+ Consider making your own marinades by mixing similar dressings and sauces.
+ Stretch your BBQ sauce by adding some ketchup, Worchesershire, honey, brown sugar, and mustard.
+ Experiment with alternatives to stir fry sauce or meatloaf ingredients with items you will find among your condiments.
+ Make pasta salad to use up little bits of salad dressing, mayo, mustard.
+Use left over spaghetti, pizza or marinara sauces for dipping grilled cheese sandwiches, topping garlic toast
*Misc.
+Visit recipe web sites such as allrecipes.com. You have an option of listing ingredients you have on hand and it will come up with various things you can make with those items.
+Plan consecutive day meals so that you can use part of your left overs without eating the same meal. Such as making a large amount of chicken and rice. You can have chicken tacos one day and chicken with rice soup the next.
+Left overs and "end of bag/box" things are a good way to experiment with trying new things and coming up with new dishes. If you are using the last bits of things that would otherwise maybe not get eaten, it is a little less of a "lost" feeling if your creations don't come out as planned.
Thursday, January 12, 2012
Reusable cleaning wipes
I love the convenience of cleaning wipes such as Clorox or Lysol wipes. It sure beats finding a rag and a spray cleaner or using paper towels, that just go to waste to clean up my home. However, I don't love all the trash they produce and the cost, if I can't get them on sale/ with a coupon can get pricey. So, I decided to make my own. This time, I didn't research prior, and just went with what I thought would work. Here is how I did it. I also went back AFTER I made them and did a little searching and found some other ways. What's great is you can use your favorite pre-made liquid cleaner or make your own. I think next time I will try and make my own less chemical-ly cleaner. Depending what cleaner you use and what material you end up using for your wipes, this can save you a lot or a little money. Overall, it is better for the environment though, so you have that going for you!
*Things you will need:
+a container, I used a baby wipe container I already had
+bottle of your favorite cleaner
+2 yards of flannel (white)
+cardboard to trace your "pattern" on to
+scissors
+water
*How To:
1) Trace the bottom of your wipes container onto cardboard (you could use paper)

2) Fold the cardboard over so your pattern is double width, cut out pattern.
3) Using your pattern as a guide, cut out squares of flannel. I suggest using a total of 2 yards of flannel, which should make about 40 wipes. I am unsure of the width of the flannel when you buy it, but all in the store I went to (JoAnn fabrics) were the same width.

4) I cut the flannel out THEN laundered it. I did this because I wanted it to fit nicely inside the box without bunching around the edges. When you launder it, they pieces shrink slightly making them fit perfectly.
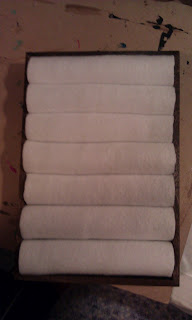
5) Fold each "sheet" in half, so that it fits in the container. Stack into two piles, about 20 pieces per stacks.

6) Add 1 cup of cleaner to bottom of container and 1/2 cup water (the cleaner I used was a little strong, so I diluted it.

7) Add one stack of sheets into the container, squish down so they soak up the liquid.
8) Add another 1 cup of cleaner and 1/2 cup water, stack second half of sheets on top.
9) Squish your sheets down and/or lightly shake the container (lid closed) to help disburse the liquid.

10) If needed, add a little more cleaner and water. You don't want a ton of liquid swimming at the bottom, but a little is fine.
11) Label your container so you know it isn't really baby wipes!
12) Get cleaning :)
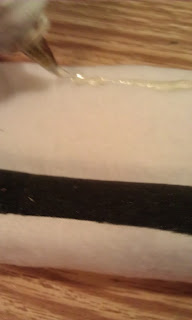
After you have used the wipes, rinse in warm water and hang to dry. Launder with hot bleach water, no need to dry, just put back into the box and add a little more cleaner.
Make sure if you decide to switch cleaner, that you use up all of your cloths and launder them and wash out the container to prevent a chemical reaction.
**Cost:
Flannel was about $6 per yard at JoAnn Fabrics, however, I had a 50% off coupon. They offer these quite often. I only bought 1 yard, but to fill the box, I would buy two yards.
Container was free as it was a pre- used baby wipes container.
Cleaner was Spic & Span antibacterial cleaner I bought at Dollar Tree for $1
Normally, I have two open containers of wipes. One for bathroom and one for kitchen. I go through approx 1 per month and a half or so for each room. These wipes normally cost between $2 and $4 for a 35 count container of wipes. I usually buy these on sale, but sometimes can't get them on sale. Per year, if I buy the cheaper wipes at $2 each, I end up spending about $32. Considering that one bottle of cleaner will last for two tubs, I will spend about $8 per month and a half.
**Total, $6 for fabric and $8 for cleaner, for one year it will be costing me about $14. If I were to use my own cleaning solution made from things I already have, this could potentially be much lower or nearly free.
**Savings: $18 or more
This isn't a lot of money, but also remember, it creates less waste and can be customized to your personal cleaner preference.
*Other ideas:
+Instead of using flannel, you could use old cut up shirts, towels, or wash cloths.
+If you want disposable home made wipes, cut a roll of paper towel in half, put your cleaning solution in the container and add half roll of towels. Let soak a few minutes, remove inner paper tube and pull wipes from center, much like pre-made wipes. You could maybe use a pre-used large wipes container for this.
+Consider making two containers of wipes so you never run out while the others are being washed, or if you like a certain cleaner for one area and another type for another area of your home.
+Instead of a baby wipes container, consider using a large zip lock or similar container with a lid.
+You could also not fold the wipes, but throw them into larger, wide mouth container with cleaner and just pulling them out as you need.
**Recipes for cleaning solution I found:
3 cups water
1/2 cup vinegar 3 good squirts of Dr. Bronner’s baby-mild liquid castile soap
about 10 drops tea tree essential oil.
mix two tablespoons of white distilled vinegar and one teaspoon of borax.
Add 1 cup of hot water and stir until the borax is dissolved.
Let this mixture cool a few minutes
Add 1/4 cup of castile soap OR 1/8 cup of liquid dishwashing detergent.
*Things you will need:
+a container, I used a baby wipe container I already had
+bottle of your favorite cleaner
+2 yards of flannel (white)
+cardboard to trace your "pattern" on to
+scissors
+water
*How To:
1) Trace the bottom of your wipes container onto cardboard (you could use paper)

2) Fold the cardboard over so your pattern is double width, cut out pattern.
3) Using your pattern as a guide, cut out squares of flannel. I suggest using a total of 2 yards of flannel, which should make about 40 wipes. I am unsure of the width of the flannel when you buy it, but all in the store I went to (JoAnn fabrics) were the same width.

4) I cut the flannel out THEN laundered it. I did this because I wanted it to fit nicely inside the box without bunching around the edges. When you launder it, they pieces shrink slightly making them fit perfectly.
5) Fold each "sheet" in half, so that it fits in the container. Stack into two piles, about 20 pieces per stacks.

6) Add 1 cup of cleaner to bottom of container and 1/2 cup water (the cleaner I used was a little strong, so I diluted it.

7) Add one stack of sheets into the container, squish down so they soak up the liquid.
8) Add another 1 cup of cleaner and 1/2 cup water, stack second half of sheets on top.
9) Squish your sheets down and/or lightly shake the container (lid closed) to help disburse the liquid.

10) If needed, add a little more cleaner and water. You don't want a ton of liquid swimming at the bottom, but a little is fine.
11) Label your container so you know it isn't really baby wipes!
12) Get cleaning :)
After you have used the wipes, rinse in warm water and hang to dry. Launder with hot bleach water, no need to dry, just put back into the box and add a little more cleaner.
Make sure if you decide to switch cleaner, that you use up all of your cloths and launder them and wash out the container to prevent a chemical reaction.
**Cost:
Flannel was about $6 per yard at JoAnn Fabrics, however, I had a 50% off coupon. They offer these quite often. I only bought 1 yard, but to fill the box, I would buy two yards.
Container was free as it was a pre- used baby wipes container.
Cleaner was Spic & Span antibacterial cleaner I bought at Dollar Tree for $1
Normally, I have two open containers of wipes. One for bathroom and one for kitchen. I go through approx 1 per month and a half or so for each room. These wipes normally cost between $2 and $4 for a 35 count container of wipes. I usually buy these on sale, but sometimes can't get them on sale. Per year, if I buy the cheaper wipes at $2 each, I end up spending about $32. Considering that one bottle of cleaner will last for two tubs, I will spend about $8 per month and a half.
**Total, $6 for fabric and $8 for cleaner, for one year it will be costing me about $14. If I were to use my own cleaning solution made from things I already have, this could potentially be much lower or nearly free.
**Savings: $18 or more
This isn't a lot of money, but also remember, it creates less waste and can be customized to your personal cleaner preference.
*Other ideas:
+Instead of using flannel, you could use old cut up shirts, towels, or wash cloths.
+If you want disposable home made wipes, cut a roll of paper towel in half, put your cleaning solution in the container and add half roll of towels. Let soak a few minutes, remove inner paper tube and pull wipes from center, much like pre-made wipes. You could maybe use a pre-used large wipes container for this.
+Consider making two containers of wipes so you never run out while the others are being washed, or if you like a certain cleaner for one area and another type for another area of your home.
+Instead of a baby wipes container, consider using a large zip lock or similar container with a lid.
+You could also not fold the wipes, but throw them into larger, wide mouth container with cleaner and just pulling them out as you need.
**Recipes for cleaning solution I found:
3 cups water
1/2 cup vinegar 3 good squirts of Dr. Bronner’s baby-mild liquid castile soap
about 10 drops tea tree essential oil.
mix two tablespoons of white distilled vinegar and one teaspoon of borax.
Add 1 cup of hot water and stir until the borax is dissolved.
Let this mixture cool a few minutes
Add 1/4 cup of castile soap OR 1/8 cup of liquid dishwashing detergent.
Subscribe to:
Comments (Atom)