Like many women, I have a plethora of jewelry odds and ends tucked her and there. Mine was getting to the point that I had crammed 2 jewelry boxes, a wall hung necklace holder, half of a free standing jewelry stand and a couple of random other areas full of pieces of jewelry. I was always fighting to untangle necklaces, dig for bracelets and wondering which little drawer such-n-such might be in. It was taking up room and frustrating. Then I thought, "I need a giant wall hung cabinet that can hold ALL my jewelry which I can see just from a glance. Simple right? Not so much. I looked at many stores and online. Most large jewelry cabinets/chests were $200+ and still were mostly drawers. I did find a couple online which were overall the idea I was going for. This one was nearly $150, but not enough hooks or storage overall.
http://www.amazon.com/Jewelry-Armoire-Mirror-Cabinet-Black/dp/B0033J8YIK/ref=sr_1_1?ie=UTF8&qid=1337210075&sr=8-1
Then I thought this one was cool, but again, not enough space, and not a cabinet, better price at about $60 though.
http://www.amazon.com/Overdoor-Jewelry-Organizer-Bronze-Longstem/dp/B004DYUAXG/ref=pd_sbs_hg_3
I gave up and decided to make my own!
I wanted it to have the following:
*Character
*Color
*MANY hooks
*An earring holder
*A ring holder
*Possibly a couple drawers (did end up with them, after all)
I wanted to use the following:
*A combo of hooks and old drawer pull/ cabinet hardware and "cup" hooks
*Cheap items
*Reclaimed items/re purposed items
* A budget of about $25
The breakdown with costs
Originally, this was going to be made from pre-made laminate shelves that you can get at any DIY place. I had two short ones and got a couple longer ones from my mom. This didn't work, because I would have had to cut them and was worried the laminate would rip. Scratch that idea.
Now, before I go into too much detail, I must say that this project WOULD cost quite a bit more, but I went "shopping" in my parent's garage/house for items to use (they are more than happy to have me take away some "junk"). I also used a few coupons for $5 off your next order coupons for a few of the items I used.
Items I found from "shopping" at my parents:
*Picture frame (used for earring holder)
*Cabinet door (used to be in my room back when I lived there, has been sitting in garage for over 15 years now!)
*Piece of faux wood wall board (used for back on cabinet)
*A couple bags of random cabinet/drawer pulls. I found a bunch of one type, a few of another to use)
*4 "L" braces (these are used to hold the cabinet together.
*Long square pieces of wood (I cut these down and used them to attach the "hooks" to)
*Random piece of 1x4 wood (used this as the "top" of my drawers)
Things I had:
*Drawers from an existing jewelry box that I used
*Spinning "hook" thing from existing jewelry box.
*Disposable grill topper (this was used for part of the earring holder)
*Rubber gloves (stain application)
*Small picture frame (used on ring holder)
*Teal paint
*Paint brushes, rollers, roller covers, paint roller tray
*Screws
*Fleece (used for ring holder)
*Hot glue/glue gun
*Mini Padlock
Things I bought and costs (approx.):
*Wood. I went to Home Depot and selected a 16' section of wood. I believe it was 1 1/2x6". This may not be exact, but I think that was the size. My door is an odd 19"x43", so I had them cut it into the sizes I need (this was free). The piece of wood was just under $6.
*White latex house paint. I got outdoor paint. It didn't much matter, really. I got a quart at Dollar Daze for $1.50.
* Dark Walnut Minwax stain. Original price was about $7, I used a $5 off coupon, so I paid about $2.
*Poly Acrylic semi gloss Minwax clear coat. Original price was about $5, again I had a $5 off coupon, so this was free.
*2 (more) sets of "L" brackets, they were about $1.50 each, and 1 sanding block, which was about $4.I used another $5 coupon for these as well so this cost about $2.
*White calk, this is to attach the earring and ring holders. On clearance for $1.79.
*Pack of white "cup" hooks, $5 but used my (last) $5 off coupon, so free.
*2 packs of foam hair rollers and small wood box, $1 each at Dollar Tree. (Used for ring holder) $3 total.
*2 small cork bulletin boards, $1.09 each. (Used for earring holder) $2.19 total.
*Pack of small clear shelf brackets. (Used for small shelf above drawers) $1
*Small hasp for door. $2.50
*Eiffel Tower decal for front (still not sure if I like it on there) I bought with a 40% coupon at JoAnn Fabrics, ended up costing I believe $5.
Total Out of Pocket Cost: Approx $26, Add Decal, $30.
Not too bad and not too much over budget.
NEXT: DIY Earring Holder!
Sunday, May 20, 2012
DIY Earring Holder (Part 2 of DIY Jewelry cabinet)
Part of my large Jewelry cabinet was a DIY earring holder. This could be done to hang alone as well. I got ideas from Pinterest. If you haven't yet checked this site out, do so!!
Anyhow, it came down to two things I wanted for my earring holder- something open to hang earring with ear wire hooks and something that I could "stick" my post style earrings in to.
I had a large frame from my mom's which was the basis of the frame. I added a mesh-like grill grate to one side and cork board (backed with cardboard) to the other. In the end, I glued a piece of scrapbook paper to thin cardboard and glued that to the back side.
I think I may have abused some sort of hot glue-usage rule?!?
Apparently I forgot to take photos of this step by step, but I can tell how I did it.
Here is the step by step:
1) I painted the frame, 3 coats of white paint and two coats of teal accents.
2) I removed the piece of plastic that surrounds the two small bulletin boards, turned them over and made sure they were side by side (edges) flush with one another
3) Used a wide strip of thin cardboard and glued it to the back of the bulletin boards to form one large piece.
4)I cut into the ridges in the side of the bulletin board's cardboard backing and pushed the edge of the grill topper grate into the cut, using hot glue to attach.
5) I turned the frame over and hot glued the earring holder to the frame.
6) Using Mod Podge, I glued a piece of scrapbook paper to a thing piece of cardboard, wait until it is dry then glued it to the back side of the area where the grill topper grate was.
7) Using the plastic strip that surrounds the bulletin board, I cut it to fit over the sections of my earring holder where I joined the pieces. Hot glued the pieces down.
DONE!


NEXT- DIY Ring Holder!
DIY Ring Holder (part 3 of DIY Jewelry cabinet)
As with the earring holder, I have found many DIY ideas for ring holders on Pinterest. This was pretty simple and cost me about $3 to make. The frame I used was a previous purchase from the same store where I got all the other supplies that I used, so this could be made for $5 or so if you had to buy all the supplies. I had purchased the stain and clear coat for my cabinet, so that cost isn't included here either. I also used paint that I had.
Here is how I made it:
Supplies: Picture frame, 2 packs of foam Hair rollers, a small wood box, white fleece, stain, clear coat, paint and LOTS of hot glue!


1)Stain the wood box, let dry and then put a layer of clear coat on top for protection and shine.
 2) Remove plastic rod pieces from foam rollers. I think I used all but one or two total from the two packs.

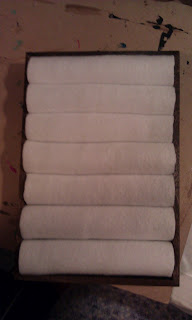
3) Determine how many rollers you will need to use by placing them inside the box, you want them snug, but not too snug that they are popping out. Cut pieces if you need. I used approx. 2 1/2 rollers glued end to end for each row.
4) Glue roller ends together, squishing the pieces together after glued to help glue hold.


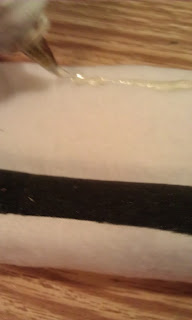
5) Cut pieces of fleece the same length as the rollers and large enough to go around the rollers with about 1/4" excess overage overlapping. Cut enough for all of the roller pieces.
6)Run a line of hot glue along the edge lengthwise on the fleece, carefully glue roller piece down.


Here is how I made it:
Supplies: Picture frame, 2 packs of foam Hair rollers, a small wood box, white fleece, stain, clear coat, paint and LOTS of hot glue!


1)Stain the wood box, let dry and then put a layer of clear coat on top for protection and shine.


3) Determine how many rollers you will need to use by placing them inside the box, you want them snug, but not too snug that they are popping out. Cut pieces if you need. I used approx. 2 1/2 rollers glued end to end for each row.
4) Glue roller ends together, squishing the pieces together after glued to help glue hold.


5) Cut pieces of fleece the same length as the rollers and large enough to go around the rollers with about 1/4" excess overage overlapping. Cut enough for all of the roller pieces.
6)Run a line of hot glue along the edge lengthwise on the fleece, carefully glue roller piece down.

7) Roll the fleece around the roller and add another line of glue to edge, securing to the roller. The roller should be covered with fleece now (except for ends).

8) Run a line of glue over the section of roller that has the fleece edge (underside) and press into top of wood box, making sure it is snug against top edge of box. Repeat with remaining roller pieces, making sure to space pieces evenly.

At this point, your ring holder could be done, but to add a little bit of a more "finished" look, I painted a basic wood frame and hot glued it to the top. This also helps hide any of the foam ends of the rollers that may be poking through.


NEXT- DIY Jewelry cabinet
DIY Jewelry Cabinet Part 4
This is the last part of my DIY Jewelry cabinet posts. If you haven't yet, read the first 3 to see how I got this far and what is what, as it is explained in those posts, and I would rather not repeat! Now, here is my step by step (or pretty close) on how I constructed this beast!

1) I started by sanding down the rough ends of the wood I purchased as well as the long pieces that I will use for the cross pieces. I drilled holes in the cross pieces (this is where the cabinet/drawer pulls will go).
2) Because the pieces were cut to my measurements, I didn't have to do much measuring here. I used the "L" brackets to hold all 4 pieces together to build a sort of frame. I used 2 per corner on the inside of the frame.


 After I had the door on and fitting to the frame, I took the door off.
4) Measuring where I wanted the inside cross pieces to go, I marked them on my frame and screwed in screws from the outside to the inside. The screws went through the ends of the cross pieces to hold them in place.


5) I painted 4 drawers from an existing jewelry box to use and used them as a visual template as to how I would implement them into my current project. The result was a kind of cobbled together piece that is better viewed than explained. Basically, I used a piece of wood which I cut to the length of the inside of my cabinet and the drawers were to go under it. For spacers between the drawers, I caulked pieces of left over wood that I used as cross pieces. Confused yet? Look at the photo! I then drilled deep enough holes to fit plastic shelf brackets into the frame for the shelf to sit on.


 6) At a few points between other parts of the project, I cleaned and painted all of my cabinet/drawer knobs and the door hardware.

7) The cabinet is more or less ready to put together now! Now comes the staining, painting and clear coating.
10) After all was dry, I caulked the earring and ring holders to the back side of the cabinet door. I painted an extra piece of the cross piece wood teal and added and bunch of cup hooks to it and caulked that to the inside of the door as well. I also painted a little mirror I had to match the color scheme and added that to the inside of the door. I let the door set flat for a couple days to let the calk cure so it wouldn't slide around.
 11) Once the door pieces had time to dry/cure, I put the hardware back on the cabinet along with a hasp to lock it if I want and added the Eiffel Tower decal... still unsure about that, but it looked too plain. I may get a thin mirror to replace it, we shall see. I then added the door to the cabinet.

12) I screwed in all of the drawer/cabinet knobs as well as many cup hooks. I also added a spinning hook thing which was re purposed from the same jewelry cabinet I took the drawers from.

 13) I screwed the door back on to the cabinet, testing the fit and making a couple adjustments.
14) I screwed in two "L" brackets with the top edge and one hole sticking out from the top of the cabinet to be used as the hangers for the cabinet.
15) I had to wait for the back piece and it was still in my mom's garage, so it was a couple day wait time and I wanted to get it done! But, once I got it cut and painted (3 coats of white paint) I was able to nail it to the back side of the cabinet.


 DONE! Finally!! It was a pain in the butt to get it onto the wall because for some reason one side the hook kept tearing the wall, so I had to move it to another wall, not where I wanted it, but it works. I got it all filled and wouldn't you know, it's FULL! Now to go back through and do a little spring cleaning of my jewelry to make more room.

1) I started by sanding down the rough ends of the wood I purchased as well as the long pieces that I will use for the cross pieces. I drilled holes in the cross pieces (this is where the cabinet/drawer pulls will go).
2) Because the pieces were cut to my measurements, I didn't have to do much measuring here. I used the "L" brackets to hold all 4 pieces together to build a sort of frame. I used 2 per corner on the inside of the frame.


3) After the frame was built, I attached the door to make sure it fit properly, apparently the wood was ever so slightly bowed in a couple spots, so I just moved the "L" brackets a bit and screwed them back down.

4) Measuring where I wanted the inside cross pieces to go, I marked them on my frame and screwed in screws from the outside to the inside. The screws went through the ends of the cross pieces to hold them in place.


5) I painted 4 drawers from an existing jewelry box to use and used them as a visual template as to how I would implement them into my current project. The result was a kind of cobbled together piece that is better viewed than explained. Basically, I used a piece of wood which I cut to the length of the inside of my cabinet and the drawers were to go under it. For spacers between the drawers, I caulked pieces of left over wood that I used as cross pieces. Confused yet? Look at the photo! I then drilled deep enough holes to fit plastic shelf brackets into the frame for the shelf to sit on.


7) The cabinet is more or less ready to put together now! Now comes the staining, painting and clear coating.


8) With cut open trash bags laying on my kitchen floor as a makeshift tarp of sorts, I applied 2 coats of stain to the cabinet frame, cross pieces and shelf. After the stain had a night to dry, I clear coated it for protection and shine.
9) The cabinet door received 3-4 coats of the white latex paint over the course of a couple days.10) After all was dry, I caulked the earring and ring holders to the back side of the cabinet door. I painted an extra piece of the cross piece wood teal and added and bunch of cup hooks to it and caulked that to the inside of the door as well. I also painted a little mirror I had to match the color scheme and added that to the inside of the door. I let the door set flat for a couple days to let the calk cure so it wouldn't slide around.


12) I screwed in all of the drawer/cabinet knobs as well as many cup hooks. I also added a spinning hook thing which was re purposed from the same jewelry cabinet I took the drawers from.


14) I screwed in two "L" brackets with the top edge and one hole sticking out from the top of the cabinet to be used as the hangers for the cabinet.
15) I had to wait for the back piece and it was still in my mom's garage, so it was a couple day wait time and I wanted to get it done! But, once I got it cut and painted (3 coats of white paint) I was able to nail it to the back side of the cabinet.


Subscribe to:
Comments (Atom)